How to Crochet an Appa Bag
Hello there and welcome to my first blog post! If you are looking for a fun little bag to make, this is the pattern for you! This beginner-friendly pattern uses only two main stitches. You will need to know the chain, of course, as well as the basic single crochet. We will also be using the decrease single crochet stitch.
If you would like to watch a tutorial, I have a youtube video up on my channel on how to make this exact bag!

Materials Needed:
medium weight size 4 yarn, two skeins, one in cream and one in dark brown
5 mm crochet hook
scissors
stitch markers
yarn sewing needle
Abbreviations:
ch - chain
sc - single crochet
inc - increase
dec - decrease
st - stitch
sl st - slip stitch
MR - magic ring
Body of the bag:
We are going to start off by chaining as wide as you would like the body to be. (I wanted a small bag big enough to fit one book into. I will be adding how I did it in parenthesis, but just remember if you decide to make your bag bigger or smaller the numbers will not be the same to mine. I chained 34)

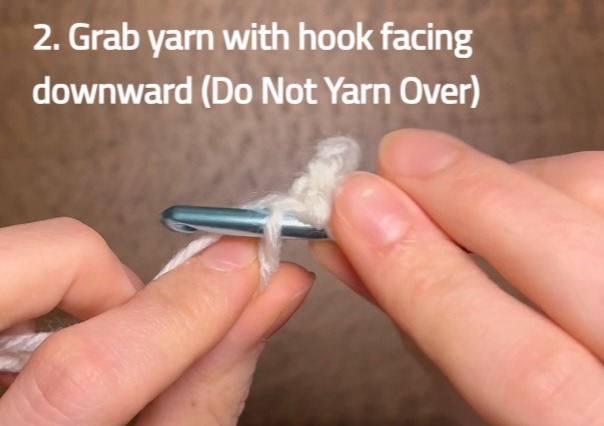
Round 1: In the first ch make a sc. (For our sc in this project, we are gonna insert our crochet hook into the chain, but pull the loop through with our hook facing down instead of the hook facing up and then yarning over. Using this method of having our hook facing down will make our sc have the appearance of little X's)


Repeat this all the way down the chain. In the last st, make 4 sc to make a "corner." Sc up the other side of the chain. When you reach the starting ch st, make another 3 sc into that st. (If you are working the same size as I did, you should have 72 sc)

Round 2: Sc in every stitch around (72)
Rounds 3-48: repeat round 2, either until round 48 or until your bag has reach your desired length. Note: the X stitches will be facing inward. You will want to flip your bag "inside out" to make those stitches face outward.

Now we are going to be working the flap onto the one side of the bag. We are going to plan out our flap in order to make the arrow centered. I am going to be working my flap in the 34 st on the back. You will want to leave 1-2 st free on either side of the flap to attach the handle on the inside later on. I chose to use the middle 10 st for the arrow, leaving 12 st for the "body" of the flap.
Row 1: We are going to continue to sc in cream in the 12 st to where we want the arrow to start.

For our 12th sc, insert our hook and pull up a loop so you have two cream loops on your hook. Bring over your dark brown yarn, and yarn over and pull through with your dark brown to switch colors. As shown in the first three pictures below (the top three). As you continue to work along in the dark brown, bring along the tails, and work your sc around them as shown in the bottom three pictures. (Bring the tails along for at least 2 st to make the join more secure)


As you make the 10 dark brown sc, in Every Other sc bring along the cream yarn because you will need it on the other side of the arrow. (Bringing the cream along in every other st versus in every st will prevent the cream yarn from peaking through the dark brown as much)
Once your reach the last st in the dark brown strip, join the cream yarn again, just like we did before with the dark brown yarn. Continue to sc across to the end of the flap in cream, leaving the dark brown yarn attached right where you changed colors. When you have completed your 12 cream st, ch 1 and turn your work. Your first row should look like the picture below.

Row 2: 12 sc across to where the dark brown begins, and make your color change again right before the strip. Make 10 dark brown sc. Don't forget to bring along the cream color on the inside of the flap on every other st. On the 10th st, make the color change back to cream. 12 sc to the end of the flap. Ch 1 and turn your work.
Rows 3-13: Repeat round 2. Remember to always bring your cream yarn along with you on the back of the brown strip. (If you are doing a different size of bag, just make sure this section is long enough to fold over the top of the bag. Remember that the bag will be "wider" when there is stuff in it. With that in mind, make sure to make the flap longer to counteract that)
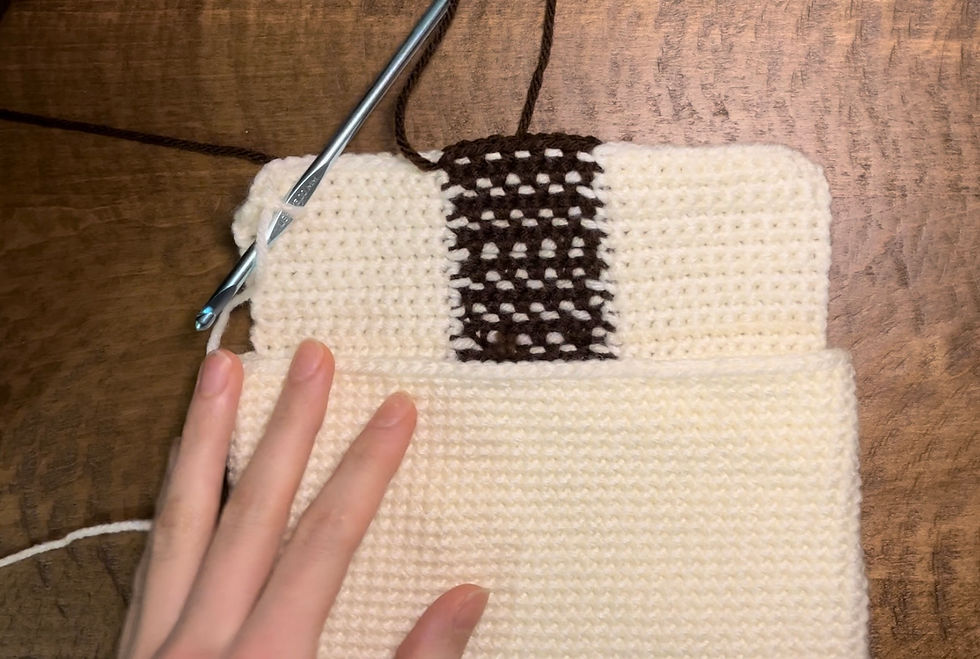
Row 14: In this row, we are going to start the arrowhead. You are gonna want to use stitch markers again because this just makes the whole process easier. (I chose to make the arrowhead 8 st wider than my stripe, 4 st off each side)

8 cream sc. In the 8th make your color change. (You can either cut your brown yarn and rejoin it here in order to not stretch it across the rows, or if you want a couple less ends to weave in later just stretch it across) 18 brown sc, bringing along the cream in every other st along the back. In the 18th, make your color change, and finish the row in cream. Ch 1 and turn your work.
Row 15: In this row we will start to bring the arrowhead to a point. 9 sc. In the 9th sc, make your color change. 16 brown sc, bringing along the cream in every other st along the back. In the 16th, make your color change, and finish the row in cream with 9 sc. Ch 1 and turn your work. As you will notice, we are just decreasing the brown row by one st on either side. We are going to continue this in the next rows until we bring our arrowhead to a complete point.
Row 16: 10 sc. In the 10th sc, make your color change. 14 sc, bringing along the cream yarn in every other st along the back. In the 14th, make your color change. 10 sc. Ch 1 and turn your work.

Row 17: 11 sc. In the 11th sc, make your color change. 12 sc, bringing along the cream yarn in every other st along the back. In the 12th sc, make your color change. 11 sc. Ch 1 and turn your work.
Row 18: 12 sc. In the 12th sc, make your color change. 10 sc, bringing along the cream yarn in every other st along the back. In the 10th sc, make your color change. 12 sc. Ch 1 and turn your work.
Row 19: 13 sc. In the 13th sc, make your color change. 8 sc, bringing along the cream yarn in every other st along the back. In the 8th sc, make your color change. 13 sc. Ch 1 and turn your work.
Row 20: 14 sc. In the 14th sc, make your color change. 6 sc, bringing along the cream yarn in every other st along the back. In the 6th sc, make your color change. 14 sc. Ch 1 and turn your work.
Row 21: 15 sc. In the 15th sc, make your color change. 4 sc, bringing along the cream yarn in every other st along the back. In the 4th sc, make your color change. 15 sc. Ch 1 and turn your work.
Row 22: 16 sc. In the 16th sc, make your color change. 2 sc. In the 2nd sc, make your color change. 16 sc. Ch 1 and turn your work. Cut brown yarn after this row.

Row 23: To finish up the flap, we are going to do a final row of cream sc across. Fasten off. Cut your cream yarn and weave in your ends.

Ears:
Work the ears in the cream yarn. Make 2.
Round 1: 5 sc into a MR. You can also use a ch 4 loop if you don't like MR (5)
Round 2: inc around, an increase means to make 2 sc in each sc (10)
Round 3: (1 sc, 1 inc) repeat this around (15)
Round 4: (2 sc, 1 inc) repeat this around (20)
Round 5-8: sc around (20)

Round 9: (8 sc, 1 dec) repeat (18) a dec means to pull up a loop in 1 st and yarn over and pull through both loops, making 2 st into 1
Round 10: (7 sc, 1 dec) repeat (16)
Round 11: (6 sc, 1 dec) repeat (14) sl st twice to make the ending more smooth. Fasten off and cut yarn, leaving a long tail for sewing purposes. Fold the ear to make a cup shape.

Horns:
Work horns in dark brown yarn. Make 2.
Round 1: 3 sc in MR. Again you can use a ch 4 loop instead (3)
Round 2: inc around (6)
Round 3: sc around (6)
Round 4: (1 sc, inc) repeat around (9)
Round 5-7: (inc) in the first 2 st, sc in the next 2 st, dec 2 times, 1 sc (9)
Round 8: sc around (9) Sl st once, fasten off, and cut yarn, leaving a long tail for sewing. If you want the horns to hold their shape, feel free to stuff them lightly before sewing them on. (I did not do this)

Strap:
Work in cream yarn.
Round 1: Ch 5, sl st together to make a loop.
Round 2: Sc around in the back loops only (5)

Rounds 3+: Keep sc around in the back loops until you have reached the desired strap length (5)
And now you have all the pieces! Time to assemble the bag!
To assemble, simply use a yarn sewing needle to sew each piece on in roughly the same place as the example picture.

I hope you enjoyed this pattern! If you have any suggestions or comments please feel free to reach out!

Comments